“Woodfiring Techniques”, 1996
This article was first published in Ceramics Technical Number 3, 1996, pages 40 to 48
—————
Woodfiring is a process used to achieve an aesthetic, as is any other kind of firing. Quite often the ends are forgotten by people infatuated with the means and the so-called romance of the woodfire, and some poor work results. In this case it would have been more sensible to produce poor work using a simpler and easier process. The potters who say they would fire a kiln empty just to be involved in the process would seem to me to have an enviable level of energy and a deplorable lack of mental capacity. Serious woodfiring is hard work in terms of preparing and stacking wood, and even with the best kilns is hot and tiring work during the firing. If results of comparable subtlety could be obtained by pushing a button I would be the first to do so.
When the decision has been made that a woodfired aesthetic is essential, there will be many years of learning involved in working out how to best achieve the particular qualities desired. Traditionally, it is said that this learning only can be achieved by doing, and by working with someone with long experience and a well developed perception. I agree with this, and although I am self-taught in woodfiring I have benefited considerably from working with other woodfirers and sharing experience. If I was starting over again and wanting to learn from the beginning I would look around at all the woodfired work and then try to learn from the person whose work I admired the most. I would start with the product rather than the process. The perceptive reader will by now have realised that an article such as this one is not really of much use in the learn- by- doing context, and that what follows will be generalised rather than specific to any woodfire aesthetic. I should point out that although I have fired a variety of wood kilns, most of my energy has gone into firing anagama kilns and much of what follows here relates to that type of kiln.
Woodfiring is a relatively simple matter if maximum temperatures are kept to the earthenware range, say below 1150° C (2100°F). I am surprised that the lower firing ranges have not been exploited by current woodfirers, particularly in areas such as majolica where the results can be considerably richer than when fired in an electric kiln. The technology is simple, and most amateur could fire a metal drum to 1150°C with wood with no trouble. The difficulties arise when higher temperatures into the stoneware range (Cone 7 to 12) and beyond are required. Most of my discussion relates to these higher temperature ranges.
To woodfire, first collect your wood. A well organised woodfirer will have a large supply of wood near to their kiln. The wood will be in all stages form green to fully seasoned and dry. I tend to keep a variety of types of wood to be used for different purposes during firing. The mainstay is pinus radiata which in the anagama burns rapidly with a long flame leaving large flaky embers which also burn away rapidly. In the green or unseasoned state it can be used briefly for periods of intense reduction, especially at high temperatures. At lower temperatures green wood tends to choke up a firebox with black unburned embers. As a substitute for green wood, I sometimes achieve heavy reduction at high temperatures by using wet but well seasoned wood which in the endlessly rainy weather in Gippsland is always available. The water in the wood turns into hydrogen and oxygen at high temperatures and this ‘rocket fuel’ produces strong reduction although wet wood tends to drop the temperature quickly.
Radiata burns most efficiently when it has been seasoned to the stage where the bark has started to separate from the wood. In my part of the world this stage is reached after about six months of drying if the wood has been stacked well. Drying longer than this means losing some of the volatile constituents which increase the heat value during burning. The bark makes a very important contribution because its ash is very high in fusible elements such as sodium, potassium, calcium and magnesium which all contribute to the natural glazing effect of the ash more so than does the ash of the wood itself.
I like also to have a supply of very dry old hardwood (Australian eucalypts) available so that if there is trouble achieving high temperatures with pine the hardwood can be relied on to do the job whilst still maintaining a light reduction. An international equivalent would be something like oak wood. I prefer not to use too much hardwood during a firing because it tends to produce brown flashings rather than red or orange, and has a nasty browning effect on some of my glazes.
Over the years I have tried many kinds of wood for finishing a firing and some of these have produced very distinctive qualities as the final overlay. The sensible approach if you wish to try this is to do your own experimenting using local timbers which are always available with little effort. Wood from fruit trees, ornamental and exotic trees will give the most distinctive surfaces. The caveat is that because you introduce this fuel right at the end, say over the last hour or so of the firing, if it produces a bad result it ruins the whole firing and months of work. Console yourself with the thought that no real progress was ever made without risk.
Setting the kiln is the process which determines how the firing will go. Placing work closely with very little gap will restrict the flamepath and tend the firing towards reduction. Larger gaps in a more open setting will move the firing to oxidation. When setting I look at the gaps, not the work - or at least consider the work in terms of the gaps it will produce. Get the setting right in a well designed kiln and the firing will go well. The temperature distribution in any kiln is determined by the setting; setting tighter in the hot areas and looser in the cooler areas will equalise temperatures in the woodburning kiln. This thinking is applied from top to bottom, and from front to back. For this reason I have little use for dampers to cut down on draft during firing. If the setting is right dampers are not necessary because the draft is determined by the setting. My practice is to set the anagama with bisque-fired work. Critics may point out that because I work in an institution with easy access to electric kilns; this is a luxury few woodfiring potters can afford. That may be true, and so may be the puzzlement as to why I would set bisque- fired ware when the work will pass through that phase of firing anyway if set raw. The advantages of the pre-bisque are many. The obvious ones are ease of handling particularly of large works when setting the kiln, and the capability of complex glazing practice. For example I use some glazes thickly, and this is easy to achieve on bisque ware; for extreme thickness I glaze, re-bisque the glaze and then glaze again. This is the only way to achieve some glaze qualities where different glazes are applied in a sequence of layers. During the setting, the use of large wet wads is impractical with raw work, because the water involved can crack the work where they are in contact with the wads.
The main advantage to me is in determining flame flow though the setting during the firing. As we all know flame goes up unless something is done to force it to go some other way. As the overall setting shrinks during the firing, this means that the bulk of the flame from the front of the kiln wants to go right over the top of the setting, leaving the lower setting untouched. If the kiln is a metre high inside then the setting will shrink at least 15 cms by the time bisque temperature is reached, leaving a huge gap at the top for the flame. If the entire setting is bisque fired the shrinkage is much less, and the reducing phase is much more easily achieved and much more active on the entire setting. I help this to happen by setting tightly at the top of the kiln, especially near the front, and increasingly loose and open towards the floor.
I am not a great believer in using pyrometers or cones to evaluate temperatures in woodburning kilns. This attitude derives from my obsession with surfaces, leading me to watch the developments on surfaces rather than be concerned about temperature as such. Methods of temperature measurement are important to beginners in woodfiring and so cones and pyrometers assist early on in building up powers of observation. It is very difficult to estimate temperature if you have no idea what that temperature looks like. There will be problems especially in reduction with a cloudy atmosphere making cones difficult to see. Using an oxygen probe to measure atmosphere conditions is also useful for beginners, to build up a picture of what various levels of oxidation or reduction look like. For experienced woodfirers none of these are necessary.
Any live fuel, such as coal, oil, petrol or wood, must be mixed with air to burn. Liquid fuels such as oil or petrol must be vaporised to mix with air. Solid fuels such as coal or wood present a different problem. The air is available only at the surface of the fuel. So the wood, for example, must be placed in the firebox in such a way that air has maximum access to it if it is to produce the greatest heat. The worst situation would be to use milled timber and place a number of pieces all parallel to each other, cutting off the air supply to most surfaces. The best situation for heat production is to use split logs, placed in such a way that each crosses the one below it. This allows the air to reach all surfaces, and as a bonus, also allows the air to reach embers as they form so that their combustion adds to heat production. Wood which has been split has a much greater surface area than the original log from which it came, and so potentially can produce heat much more quickly. A side benefit is that if the wood has been split green and stacked so air can circulate through it will season and become usable much sooner.
The most basic understanding required to handle a woodburning kiln is how to control oxidation and reduction, while maintaining a suitable temperature rise or fall management. Everyone involved in woodfiring knows about the ‘rhythm of stoking’ and I have developed a ‘graph’ which helps with understanding the relationship between atmosphere and temperature rise.
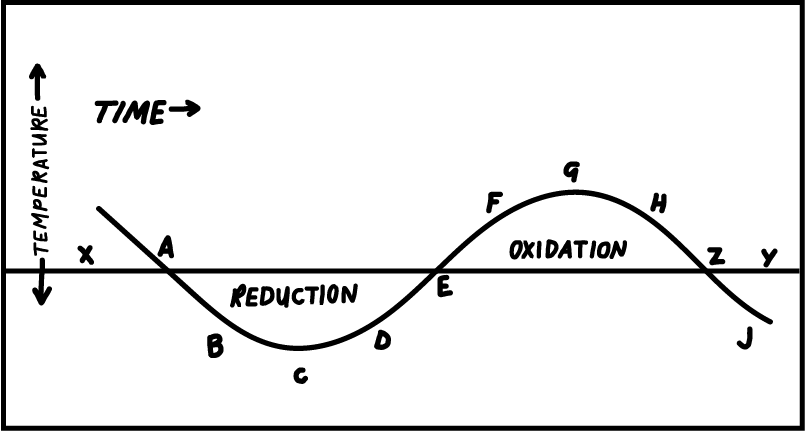
Imagine that if you stoke at point A, the temperature will start to drop and the atmosphere will become reducing. As the volatiles burn from the wood, the temperature drop will continue and the reduction will increase until point C. From then, the amount of reduction will lessen and the temperature will start to rise as the cellulose/carbon component of the wood begins to combust. From point E onwards the atmosphere becomes oxidising and the temperature begins to rise above where it was before stoking. At point G the temperature has reached a maximum and there is strong oxidation. As the fuel burns away the temperature begins to drop again.
Having a picture of this graph helps to understand how a stoking pattern can be developed, so long as it is understood that there is never a constant atmosphere in a woodburning kiln. You always need to work on the basis of the overall trend rather than a constant. Let us say you want to maintain reduction constantly with no overall temperature rise. You would stoke at point A, and then again at point E. When you stoke at point E, the first part of the curve from A to E will be repeated and there will be constant light to heavy reduction with no temperature rise overall. If you wish for the temperature to rise gradually, but to maintain reduction as much as possible, then you would stoke each time at point F. Then each subsequent reduction takes place at a slightly higher temperature.
The concept of cycles of oxidation and reduction is understood easily by woodfirers because it happens naturally in the wood kiln. You stoke, it reduces. You let the wood burn down, it oxidises. I remember a discussion many years ago with Ivan McMeekin about these cycles. McMeekin was making woodfired porcelain and he was very concerned to produce the orange- coloured flashing on the foot of bowls around the margin of his celadon glaze, this being a quality he much admired in early Chinese porcelain ware. When he started firing in a gas kiln the flashing disappeared. In musing about how to bring it back he speculated that if he was to try alternating oxidation and reduction every fifteen minutes or so that may help. I did an experiment which I thought might be useful and tried this alternating procedure in my next porcelain firing and there was the flashing to a dramatic extent. I have always considered since that the alternating atmosphere was a key to producing flashing, and this led to a long series of experiments in the anagama. I tried the most obvious alternation, stoking and letting the wood burn till there was full oxidation, right through the firing but with poor results. Longer cycles of oxidation and reduction over 4,6, or 8 hours gave better results. I have now eliminated the oxidation and work in cycles of light reduction if I want temperature rise and heavy reduction to create ash deposit. I suspect that much of the flashing occurs at the end of the firing now during the reduced cooling process which I follow.
The ember bed contributes significantly to both heat production and atmosphere and so its importance during the firing should not be overlooked. Ivan McMeekin provided a full discussion of the chemistry of wood burning in the Proceedings of the Woodfire ‘89 Conference. In practice, a deep ember bed contributes significantly to reduction by providing carbon monoxide, but it can only be effective if it is well managed. Air can be provided underneath the ember bed by fixed mouseholes, but I prefer to use extruded tubes made from an alumina/kaolin mix. These can be moved around during the firing to provide air exactly where it is needed, or can be sealed off or removed altogether. They can be kept open by gently poking a steel rod through to move cold embers from the end. Even more preferable in the anagama is simply raking the embers nearer to an air supply. For example in the sidestoke areas embers burn away more quickly near the stokeholes than they do in the centre of the kiln, and so I gently rake the embers from the centre to the sides about every 3 to 4 stokes. This produces a live, even ember bed which contributes significantly to heat production. Ember management is also essential in the front of the anagama kiln. I rake embers from deep in the firebox back to the front of the kiln often, turning them gently in the process. I have seen potters raking furiously and throwing embers around supposedly to get more ash through the kiln, but the result of this is to break up the embers into fine densely packed particles which are much more difficult to keep alive and burning. When heat rise is required I like to rake a hollow in the embers near to the stokehole and then place wood across this hollow so all surfaces are exposed to air for efficient burning.
It is not uncommon for someone inexperienced in the anagama firing process to reach a stage where all the fireboxes are filled with embers and it becomes impossible to stoke without making the situation worse. This happens particularly when firing with dense hardwoods because the embers tend to be fine and densely packed. The extreme answer to this situation is to artificially blow air through a tube into the embers. Many woodfirers who will not admit to such things, have resorted to this. A more gentle and natural technique for burning down the ember and restoring control of the kiln is my alternating sides technique. In this, one side of the kiln is left completely untouched for a period up to several hours. The front of the kiln, and the other side, are stoked infrequently, using the lightest wood available; or at least the wood which produces the largest, lightest embers. If only dense hardwood is available then it is best to use large pieces and let them burn down well before restoking. This should do two things, one being to keep the kiln under reducing conditions because oxidation if prolonged will produce undesirable brownish colours on the work. The other result is that the side of the kiln where no stoking is done will have the embers burned away slowly and will be returned to a condition where the fireboxes increase slowly in temperature. Then normal stoking can be resumed on the burned-down side, leaving the other side untouched so that the embers can burn down there. This process of alternating, first firing one side for several hours and then the other, may be the only way to fire with some hardwood fuels which build up a dense mass of embers and are difficult to pass air through in order to burn them away.
Reduced cooling was the hot topic among woodfirers in Australia some years ago and has now become a standard part of the firing procedure for some potters, myself included. The practice is not new and has been used in the past for example by potters firing glazed earthenware in electric kilns, then introducing a solid fuel such as wood or coal at full temperature. The result is a matted or even crystalline surface quality when appropriate glazes are used, as well as a colour change. The finest work of this kind I have seen was produced by Otto and Gertrude Natzler in the United States.
In the anagama reduced cooling seems like a simple matter , although the more I work with it the less simple I find it really is. The process involves a finish by firing to peak temperature, filling the firebox and sidestoke ports with wood, preferably a slow burning hardwood, and then, in my procedure, closing off the top of the chimney with a kiln shelf. Other potters might push in the damper if there is one, or open all passive dampers if they are in use. This is accompanied by sealing all sidestoke holes and almost sealing the front stokehole, leaving just a few tiny gaps for air to be drawn in. The fuel burns away over two to four hours, and a pyrometer used in one firing showed that when the fuel burned away to embers the temperature actually rose again to the original peak temperature, accompanied by strong oxidation. I suspect this final oxidation has something to do with the development of flashing colours under wads near the front of the kiln. The end result is a matting of any glazed surface on work close to the fireboxes, caused by the extreme reducing conditions. The reduced cooling technique has by no means been fully explored and developed, and represents a fruitful area for experiment.
The question of colour in the wood kiln is an intriguing one. Many woodfire potters have become either intrigued or obsessed with producing a red colour on the clay surface, usually as a flashing effect. I must admit to having been caught up in this quest at times and am embarrassed to admit that I do not have much to contribute. The rich red colour certainly is much more difficult to achieve at high temperatures ( above1100° C, 2012°F) than it is at conventional earthenware temperatures: witness for example terracotta which is orange-red at 900-1000°C (1650-1830°F) when oxidised. One experience which has intrigued me is that some high fired stoneware glazes with a high iron content can be refired in an oxidising atmosphere to produce an entirely different quality of colour. The example I have in mind is a brown reduced tessha type glaze which I originally fired to Cone 10, then refired to 1040°C (1900°F) in an oxidising atmosphere, holding at this temperature for about 10 hours. The result was a glaze with the same opacity and surface quality, but coloured an incredibly vibrant red. I have no explanation for this but it has always seemed significant. I do know that the brightest reds and pinks I have seen as flashing colours from the anagama have come from cool parts of the kiln. For a period I did a number of firings where the temperature was never allowed to go over 1150°C(2100°F) over the four day firing period and the result was a series of pots with a lovely dry quality of ash deposits and quite bright flashing colours.